
Rainforest Photography: 8 Top Tips for Stand-Out Images

Tropical rainforests are arguably one of the most exciting habitats in the world to discover and watch wildlife, but rainforest photography can be extremely challenging.
Unlike on, let’s say, an African safari, where it is often possible to see a wide range of animals clearly and in good light, visiting a rainforest presents a plethora of difficulties that potentially stand in the way of creating memorable images.


Simply finding subjects can be hard, and once you have found them, they can often be buried behind foliage in a dark, shaded recess, making photography all but impossible. So, what should you do?
Here are some tips to help you approach the creation of great rainforest photographs.
1. Know where to go
Mammal and bird photography in many localities is difficult at the best of times, as considerable time and effort may be needed to get close to subjects. This is especially true in rainforests, where many species live high in the canopy and are inaccessible.
However, it is often the case that some species, like primates, become habituated around well-established lodges or research centers, and concentrating efforts around these locations generally pay off.

Additionally, some lodges have canopy towers and walkways that are excellent places for photography, especially early and late in the day (e.g., Napo Wildlife Centre in Amazonia, Ecuador, and Borneo Rainforest Lodge in Danum Valley).
For other subjects such as flowers, invertebrates, frogs, and reptiles, it is beneficial to engage the help of a local guide, especially if you are unfamiliar with the location.
With a modest investment, you will cover a greater breadth of subjects and, equally importantly, know which potentially hazardous ones to avoid approaching too closely, such as irritating and poisonous plants, stinging insects, or venomous snakes!
Read more: How to Photograph Rainforest Wildlife
2. Consider your compositions carefully
You might automatically assume that being surrounded by a forest would make habitat shots easy. Not so. Without careful composition, there’s a tendency for these photographs to look messy and cluttered: a mass of tangled greens and not much else!
There are two approaches.

Firstly, for forest interiors, use a wide-angle lens and select a composition with a strong foreground element, ideally some space behind, and then a well-foliated backdrop at the rear without too much bright sky peeping through.
As light levels are invariably low, cameras should always be held firmly on a tripod, and judicious use of fill-in flash can lift the foreground. For this, I use a softbox/diffuser to make the results more natural.
On overcast days with naturally diffuse light, an aperture/shutter speed combination on or just under the ambient exposure value, and a flash compensation setting of -1.3 to -2.0EV generally works well, but you will need to experiment.
Grand-scale photographs of rainforest exteriors lend themselves to short and medium telephoto lenses that pick out specific elements of an overall vista.

There needs to be lots of space between you and the subject: viewpoints over the canopy or views up and down rivers flanked by the forest are ideal.
Concentrate on early mornings when mist and cloud hang over the forest, adding some contrast, ‘layering,’ and depth, and a great deal of atmosphere. Again, a tripod is obligatory.
With both interiors and exteriors, saturation can be altered to suit with a polarizing filter.
Read more: Composition in Landscape Photography – The Essential Guide
3. Show off your subject
During the day, look for flowers, fungi, lizards, and snakes especially, and concentrate on compositions that show the subject clearly in situ.
There’s no point being in the middle of a spectacular rainforest teeming with life and ending up with photographs that look as though they were taken staged in captivity.
Here, my favorite lenses are close-focusing wide angles (e.g., 14-24mm f/2.8 or 15mm f/4 macro) or even a fisheye (e.g., 8-15mm): with compositions where the subject dominates the foreground, leading the eye to a curtain of forest behind.

Once again, the use of trace amounts of fill-in flash helps emphasize the subject, but make sure you take the flash off-camera (with a dedicated TTL cord or radio trigger) and use a softbox/diffuser.
You will then be able to direct the flash appropriately and avoid creating a shadow with the front of the lens.
When using medium or long telephotos for more distant subjects, don’t be fooled into thinking it is necessary to always have a perfectly clear view.
Another way of ‘placing your subject within its habitat’ is to use out-of-focus foliage and other forest elements in front of the subject.
With careful choice of your position and composition, these blurred, diffuse areas can partially obscure the subject and help ‘set’ it within the picture.
Such images work best when using wide-open apertures (e.g., between f/2.8 and f/5.6), but always try to make sure there is a clear view of the most important parts of the subject, which are usually the face and eyes of an animal.
Read more: How to Use Perspective in Nature and Wildlife Photography
4. Go out at night
In many rainforest areas (Costa Rica, Ecuador, Peru, Madagascar, and Borneo), an added dimension is to go out looking for wildlife at night.
After dark, a new cast of characters parades onto the photographic stage: various invertebrates, reptiles, and, in particular, frogs make prime subjects.
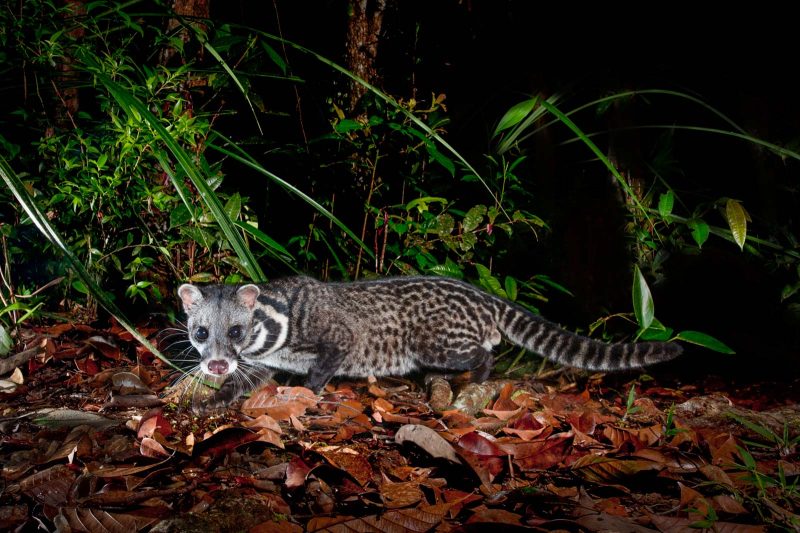
Lodges and research camps often attract nocturnal animals, including small carnivores that scavenge or investigate and feed on insects drawn into lights. In such instances, it may be possible to ‘stake out’ pre-identified locations and set up several flashes.
Most nighttime photography is more of the “wander around and see what there is” variety. Most of the time, subjects include frogs, reptiles, invertebrates, and occasionally nocturnal mammals.
Here, it’s best to concentrate on the smaller subjects, so carry only a simple medium telephoto (105mm) macro setup with two or three small flashguns that can be fired in tandem and remotely.

Being able to have a second flash behind a subject to provide some backlight can transform images.
I recommend using flash diffusers/softboxes to modify the light fired from the front, but not for backlighting, where direct light works better. Getting the right balance between front and backlighting is a matter of experience and some trial and error.
Read more: How to Photograph Rainforest Frogs
5. Focus in
Tropical rainforests are difficult places to work, especially for prolonged periods. The heat and humidity are tiring, biting insects can be a regular irritant, and the constant damp makes it tough to keep everything working.
They can also be overwhelming and daunting, and it is often difficult to know where to begin. The secret is to break it down into manageable component parts rather than trying to tackle the whole thing.
If you are a relative newcomer to rainforests, perhaps initially concentrate your photographic efforts on the habitat itself and smaller, less mobile subjects like flowers, invertebrates, frogs, and reptiles that are often easier to find.

There are two advantages to this: firstly, you’ll return home with more pictures, and secondly, you won’t need to carry large amounts of heavy equipment.
Tropical rainforests provide endless opportunities for close-up or macro photography, be it insects, other invertebrates, frogs, small reptiles, flowers, or the range of fungi species.
And while the basic principles are the same as for all other types of photography, there are some specific additional considerations worth mentioning.
Read more: Using Cameras in Tropical & Cold Environments
6. Stack your images
Depth of field is perhaps the major issue: at close focusing distances, the depth of field for any given aperture reduces, so even at very small apertures, it is very narrow.
This sometimes means it is virtually impossible to take a photo where the entire subject (from front to back) appears in focus and sharp.
There are times when this can be used to creative advantage as deliberately using large apertures with incredibly shallow depths of field can create powerful and pleasing images with a more abstract quality.

However, when more depth and detail are required, a solution is to focus stack the image. I still use an aperture of f/11 or f/16 and take 20 to 30 images to create the stack.
Most mirrorless cameras now have in-built stacking capabilities, but using a focus rail is an alternative if your camera does not have this.
Read more: How to Focus Stack Macro Photos in the Field
7. Manage your lighting
Lighting is also a significant consideration. Close-up photography regularly requires small apertures (big f-numbers) to create adequate depths of field. However, these let in less light, resulting in very slow shutter speeds.
If the camera is on a tripod and the subject is completely static, this is not an issue. However, if the subject is moving in any way, it will not appear sharp when taken with a slow shutter speed, even if the camera is on a tripod.
The solution is to use flash, either entirely or to ‘balance’ with the natural light.

While on the topic of lighting, it is also worth mentioning that overcast conditions, rather than sunny conditions, are generally better for macro photography and rainforest photography.
When there is cloud cover, particularly the wispy high-altitude varieties, the light levels remain high, but there are no harsh highlights and deep shadows.
Instead, the soft, diffuse lighting allows for detail and natural color to be captured accurately. Indeed, even a rainy day can provide favorable lighting conditions.
Read more: How to Balance Flash with Ambient Light in Macro Photography
8. Know when not to shoot
One of the marks of a good photographer is knowing when not to take pictures. There are those who adopt the ‘machine gun’ approach and take thousands of frames in all conditions and situations, hoping that some will hit the mark.
This hardly constitutes a competent, considered, practical approach and results in thousands of images that need to be trawled through to identify any good ones.
It is preferable to pick and choose your moments carefully and only take photos when conditions and situations are conducive. This approach leads to better photos!
Despite the challenges they throw at you, rainforests will present a plethora of opportunities, and there is a danger of getting a bit too ‘trigger-happy’ if you are not careful.
It pays to take a deep breath, remain calm, and consider what you are doing and what you are hoping to achieve each time you look through the viewfinder. Bear this in mind – is the photo you are considering really worth it?
In conclusion
In short, the secret when working in a rainforest is to keep it manageable and simple. There are numerous difficulties already working against you (dampness, heat, humidity, low light, etc.), so overcomplicating the issue is counterproductive.

By concentrating on accessible and controllable subjects, your frustration levels will reduce, and your success rates will be better.
Once you have become comfortable with the challenges the environment presents, then perhaps consider expanding your repertoire on future visits. And once you have been to a tropical rainforest, you will want to return time and time again.


