
Create Impressionistic Images Using Multiple Exposures

The technique of double or multiple exposures has been in existence since photography began as a way of creating more artistic representations of a subject. Most film cameras made this technique very straightforward by allowing the shutter to be reactivated without winding the film on. This allowed one or more exposures to be superimposed to create the final image. With digital SLRs, the ability to create these in-camera multiple exposures has largely been absent until more recently, but the multiple exposure function is now being added to a growing number of the latest cameras.


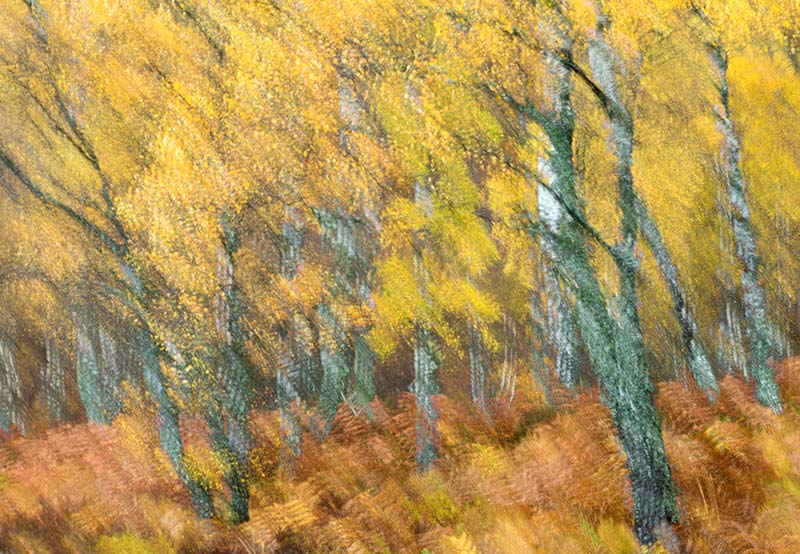
There are several ways to take advantage of the multiple exposure function in terms of creative nature photography, but the principal is essentially the same – that is to layer images that may be framed or focused differently to each other to create an impressionistic picture. In its simplest form, this would a double exposure consisting of two overlapping frames, although most cameras that have this function allow multiple exposures of 9 or more frames. A double exposure will often produce the desired effect but sometimes creating multiple exposures of 3 or more frames will create an enhanced image or one with a different look to it.
Once you’ve established whether your camera has a multiple exposure (ME) function, then all you need to do is enable it and select the number of frames that you want to form the ME – set 2 to begin with for a double exposure and then experiment with more once you get the feel for it. Multiple exposures can be created of a variety of subjects using a number of different techniques with differing outcomes. Subjects that work well include flowers, leaves, plants and trees but the technique can also be applied to wider landscapes. Whilst there are many variations of the ME technique, one that works very well is to layer a sharp frame of a subject with a defocused frame, to create a dreamy soft effect with colours bleeding into each other.
To create the double exposure above, you’ll need to have the camera mounted on a tripod as the two frames need to overlap precisely. It is possible to shoot handheld multiple exposure images, but the results are more hit and miss so I’d recommend a tripod, at least to begin with. The choice of lens is determined by the subject and the framing for the shot but a short-telephoto zoom is ideal for many situations. Pick a subject that you think will work well with this treatment and frame up the picture in exactly the same way that you would do for a ‘normal’ shot.
Another variable for the ME technique is the aperture, since depth of field will effect the outcome of the final shot. For the sharp frame, try a small aperture of about f/16 to maximise depth of field. After taking this first exposure, the camera will allow you to take a second exposure on the same frame. This time you want to create an out of focus version of the same subject. So, keeping the lens fixed in the same position, manually defocus the lens (switch autofocus off by moving the button to MF or M). The amount by which you defocus is again a variable and the ‘soft-focus’ effect will be more exaggerated with a greater degree of defocusing. This becomes more intuitive with practice as you figure out how defocused the lens needs to be to produce an effect that you like.

For this second defocused exposure, depth of field needs to be minimised as you don’t want to sharpen this exposure by shooting at f/16 as you did for the first exposure. You’ll therefore need to alter the aperture and set it to the maximum possible for the lens that you’re using (e.g. f/4). Then take the second frame. The camera will then automatically layer these two frames to produce the double exposure. This can be done in RAW (as well as JPEG) just the same as for regular shooting, thereby giving you the usual control over the final image should you wish make adjustments during processing.

Exposing for a ME image can be a little bit of trial and error if your camera doesn’t take care of this automatically. However, many do offer multi exposure control that allows you to select whether you want the camera to adjust the exposure automatically to account for the double exposure or whether you do this yourself. Traditionally with film cameras you were exposing the same piece of film twice therefore the exposure settings for each frame needed to be halved so as not to overexpose the photograph. The principal is essentially the same with digital cameras, so if for example you were shooting the ME manually then each frame of a double exposure would need to be taken at -1 to arrive at a correctly exposed picture. If the camera can do this automatically then it’s probably best to select it to do it for you, unless you really want to have greater control over the exposure. It’s not complicated to do it manually but it’s easy to forget to make the necessary adjustments.
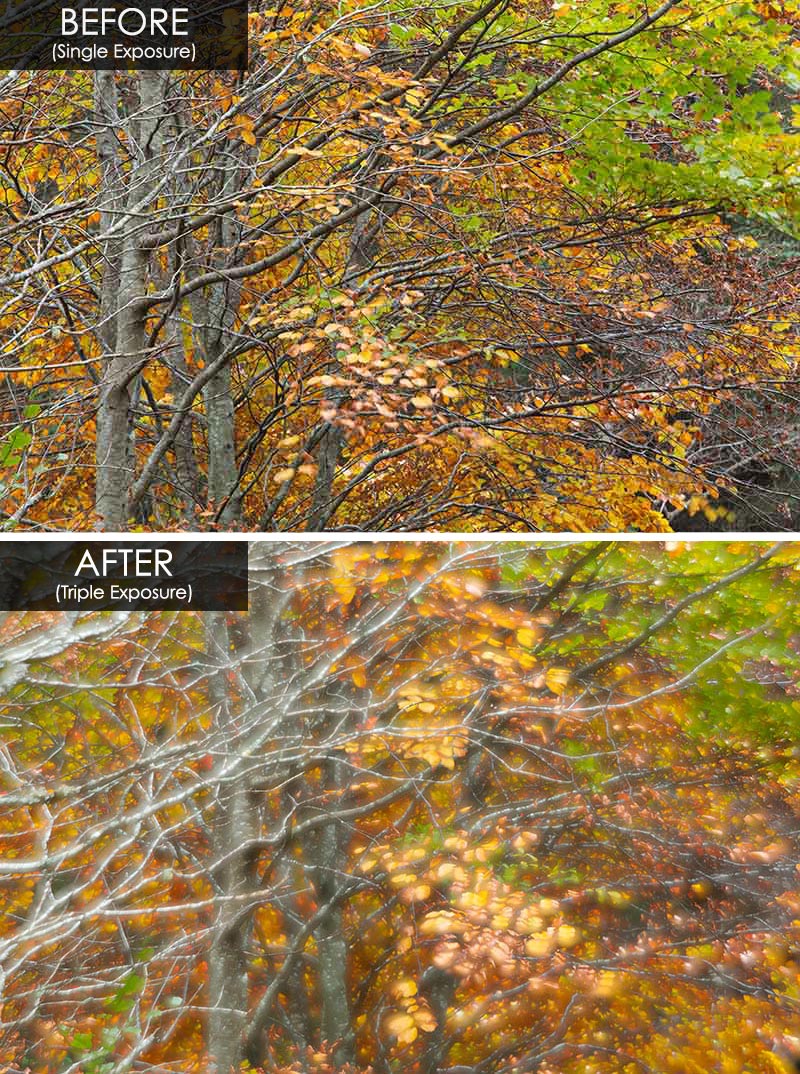
In order to accentuate the defocusing effect, you may want to experiment with 3 or more multiple exposures rather than just 2. So rather than simply having one sharp and one defocused overlapping frames, you can alter the effect by having one sharp and two defocused frames, for example. This creates subtle changes to the final result as it allows you to overlap frames that are defocused to different degrees with the first sharp image. This doesn’t require anything more than changing the number of frames that make up the ME in the camera’s ME menu settings (e.g. to 3). You would still take the first sharp frame in the same way. Then take a second frame with the subject only slightly defocused and then the third with it more defocused. Similarly, you could experiment with 4 or more frames for the ME, with each frame being sequentially slightly more defocused than the last.
There really are no limitations to this technique and, in addition to defocusing the lens, it’s possible to create different interpretations of a subject by slightly changing the composition for the second (and subsequent) frames of the ME. This is again best done on a tripod to allow for fine control over framing. For this variation of the technique you could shoot each overlapping frame in sharp focus, which can lead to an image similar in appearance to a zoom burst, if it’s a ME with a high number of frames. Multiple exposures in low light also open up the possibility of introducing in-camera movement i.e. deliberately moving the camera during a long exposure to creating subject blurring. For instance you could shoot one sharp exposure and then a second where you move the camera to get a blurred effect to create the double exposure.

Ultimately, multiple exposure images are something to experiment with to find out what works and then refine the technique until you arrive at a result that floats your boat. There’s no reason why you cannot create very effective multiple exposures of completely different subjects, and this is a well practised technique. For example, you could shoot one exposure of a flower and then overlay it with a second exposure of another flower, either of the same species or a completely different one. In fact, the second or third exposures could be totally unrelated if you wanted, but bear in mind if the subjects are some distance apart you’re going to end up doing a lot of running about to create each ME image!
Multiple exposures won’t be for everyone, but it’s definitely worth giving it a go and you can have some great fun experimenting. If your camera doesn’t have a multiple exposure function it is still possible to create the same effect by layering images in Photoshop and adjusting the opacity of each layer to achieve the desired effect. For this you would need to shoot two or more frames taken specifically with the aim of creating a multiple exposure, using the same ideas as outlined above.


