
5 Mistakes to Avoid When Processing Star Photos

If you’re already an aspiring nightscape photographer, the on-location capturing of your images is only part of the learning curve. Once you get your images onto your computer and into Lightroom (or your own favorite raw processing software), you might be tempted to treat any problems that arise with the same techniques and tricks that have worked for your daytime landscape photos.
There are five distinct mistakes to avoid, however, before you dive headlong into just “cranking the sliders” of your favorite go-to enhancements.
1. Wrong White Balance
One of the most common mistakes that new nightscape photographers make is using the “wrong” white balance. This is an easy mistake to make, yet it is also a broad opportunity for rule-breaking… also known as creativity.

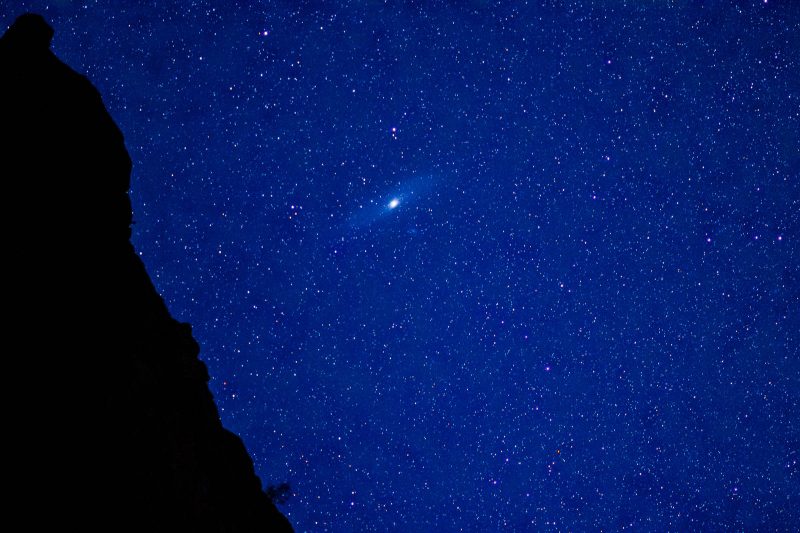
Some veteran nightscape photographers will insist that the night sky must always have a white balance at a specific kelvin measurement, regardless of the actual ambient light, be it moonlight or city light “pollution” (which differ by thousands of Kelvin).
Further Reading: What is White Balance?
I personally take a more flexible and dynamic approach, affording room for both a basic rule of thumb, plus artistic creativity. If there is bright moonlight, that leads me to process a scene more along the lines of daylight white balance, anywhere from 4500 Kelvin to 5500 Kelvin, or even 6500 Kelvin if I want it to feel a bit warm.
On the other hand, if there is significant light pollution in the area, I’ll choose a white balance that is much lower – anywhere from 3500 Kelvin to 4500 Kelvin. I make this decision based largely on whether or not the night sky itself looks neutral; it’s as simple as that. If there is a city nearby that appears quite warm, then so be it. Often it can balance quite nicely with a relatively blue-ish night sky.

Of course, to many nightscape photographers, the ultimate scene is a clear, moonless night without any light pollution even remotely showing up on the distant horizon. What white balance do I choose in this case? Usually something between 4500 Kelvin and 5000 Kelvin, depending on what seems to fit the scene.
When all else fails, however, is there a secret trick that experienced nightscape photographers use as a quick sanity check? Of course there is. Take your saturation slider and temporarily max it out to +100, and see if this brings out an overwhelming warm or cold tone. If so, dial your white balance a little bit in the opposite direction until the sky looks more neutral. Then, of course, don’t forget to dial your saturation back down to zero.
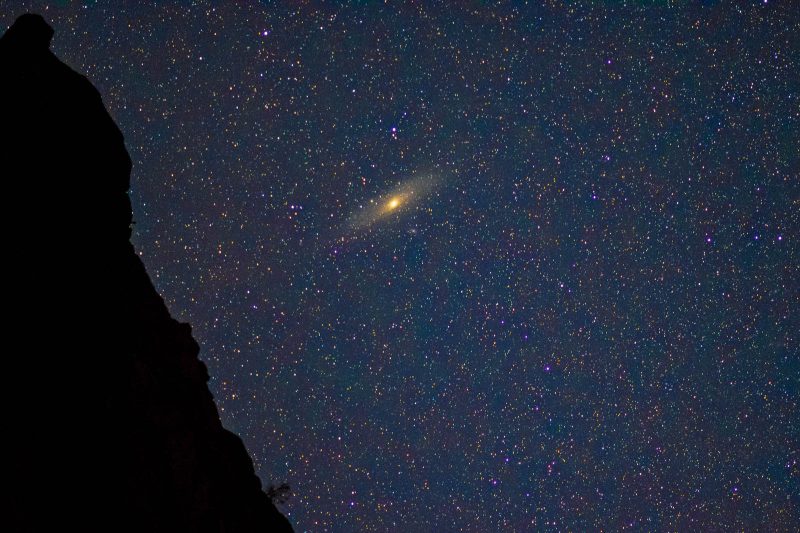

2. Too Much Saturation
Speaking of saturation, we come to our first major “no-no” of nightscape post-production.
At night, the human eye is extremely hindered in its ability to discern color. This has to do with how the rods and cones in the human eye work, and which of the two is utilized more when what we call “night vision” is in effect.
It is true that there are many beautiful colors present in the night sky. There are even specialized cameras, such as the Nikon D810A and the Canon 60Da, as well as custom sensor modifications that are possible. Both help to capture these colors which the human eye, and “ordinary” cameras for that matter, can’t really see.

However, it is a mistake to think that an ordinary camera can compensate for this shortcoming by simply driving up the saturation beyond a small, modest bump. If you’re hoping to enhance the color in a small nebula, or any other heavenly body, you’re better off doing it with a specialized camera, a modified camera, or at least a dedicated application. In Lightroom, unfortunately, and in most other raw processing applications, saturation is just too blunt of an instrument to accurately represent the natural beauty of a nightscape. Light pollution blobs will “go nuclear” on the horizon, and airglow will look similarly tacky.
In short, if you go wild with your saturation you’re only kidding yourself. Keep your images timeless, realistic, and classy. Just say no to over-done saturation. (And no, +100 Vibrance is not okay, either!)
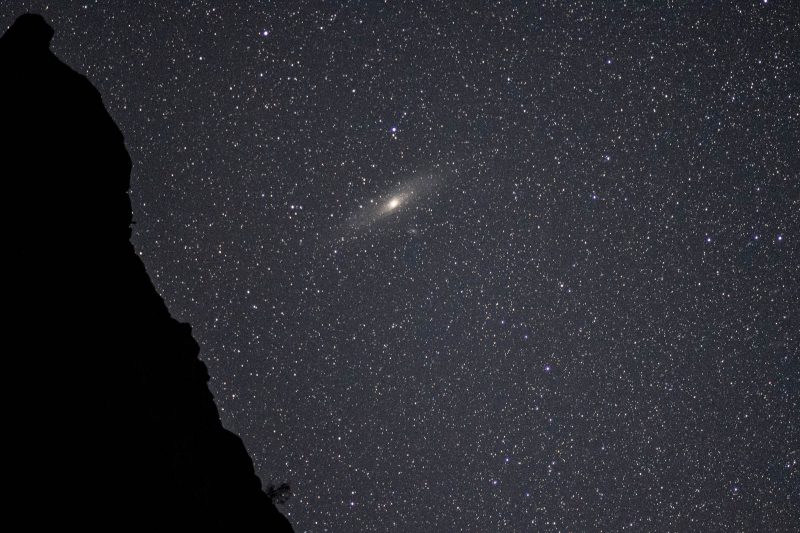
3. Too Much Clarity
While the issue with seeing color “naturally” has more to do with the rods and cones in the human eye (and the different wavelengths of light that are more visible in the night sky), this next mistake has more to do with the actual natural conditions that occur at night, regardless of the camera you’re using, or how good the human eye is.
Simply put, night scenes naturally have very low contrast; it’s no easy task to balance and create a realistic image that doesn’t look fake, yet still “pops”. Often, when there is nothing but pure starlight present, the landscape often receives very, very flat illumination.
Clarity is one of the settings that photographers tend to gravitate towards, cranking it up too high simply because its effect appears to be impressive at first glance – especially on flat, softly lit daytime images. Clarity is indeed effective at enhancing a night sky, however some portions of the image can become “over-cooked” sooner than others, when performing the adjustment globally.


I recommend never going much higher than 0-10 with the Clarity slider for night skies. If you need additional clarity to help restore local contrast to the landscape or sky itself, use a local brush or graduated filter in Lightroom that only affects the desired area.
Note: In night scenes where the moon is shining very brightly, the exact opposite can be the case because the moonlight dulls the sky, but makes the landscape appear harshly lit. Either way, whichever part of the scene is more in need of Clarity, brushes and graduated filters are your friend.
Further Reading: Lightroom Tutorials: Everything You Need to Process a Photo
4. Too Much Dehaze
Having a similar effect to the Clarity slider, Dehaze is a relatively recent invention by Adobe, one which has apparently gotten the reputation as a “magic wand” that can “beautify” any photo, whether it be in daylight or under starlight. It works well at what it was designed for, of course: cutting through the dull flatness of a hazy daytime scene.
Now, however, the roles are often reversed: the Dehaze slider is usually an effective tool at enhancing the Earth itself, compared to the gritty effect that Clarity can have. Unfortunately, too much Dehaze can have the opposite effect on the sky, making it appear over-edited very quickly.


Therefore, the opposite advice applies: while +30-60 Dehaze might fit your personal taste on certain night landscapes, it is best to use a local brush or grad filter for this enhancement, and avoid going any higher than +10-30 for the night sky itself.
Note: Again, the opposite can be true under bright, harsh moonlight. So any necessary heavy-handed Dehaze adjustments should be localized.
5. ‘Muddy’ or Grey Highlights
Last but not least, the final mistake that nightscape photographers make has to do with highlight preservation. This is especially prevalent when shooting in the vicinity of light pollution, which can create hot, warm blobs of light on the horizon in your nightscape photos.
As a general rule, if you find yourself having to heavily use either the Highlights slider or the Whites slider, there is a very good chance that the resulting image will look dull and unnatural.


If there is a bright, unnatural highlight in your scene, beating it into submission with “recovery” is not going to fool anybody. Your best course of action is to try to process the whole image differently to accommodate the blown highlight, or keep the preservation techniques to a very subtle, smooth level. If you’ve somehow simply exposed the Milky Way itself a little too brightly, hopefully it can be preserved, otherwise chalk it up to a learning experience – don’t blow out the night sky! (Always check your histogram!)
There are some special filters that you can use which may help to reduce the effects of light pollution, but unfortunately sometimes there is no good solution to an over-exposed night sky, except to go back and re-shoot the image another time.
As a side note, you can support various dark sky organizations which promote the reduction of light pollution in urban and suburban areas, as well as an awareness and appreciation for the night sky by society in general.
Disclaimer: Photography Rules Are Meant to Be Broken!
Of course, of all the things in photography that are subjective, post-production is one of the most subjective of all. Some photographers may have a significantly different opinion on the do’s and don’ts when it comes to any of these editing parameters, and for the most part that’s okay.


If you’ve been a nightscape photographer for many years and have a very good handle on what you’re doing in Lightroom, then you’ll probably not be diverging from your present course very dramatically, whether your style ranges from “heavy-handed” to “neutral”.
If you’re just barely getting into nightscape photography now, however, practise this one golden rule of post-production that applies to all of photography: when in doubt, if you think you’ve over-done something, dial it back halfway, take a break from your computer for a minute, then come back and view it with fresh eyes, and dial it back up to where you originally had it. This will help you know whether or not you’ve truly “over-cooked” your nightscape photo.
Further Reading: How to Get Sharp and In Focus Stars
If you have a completely different set of guidelines, please do comment below!


