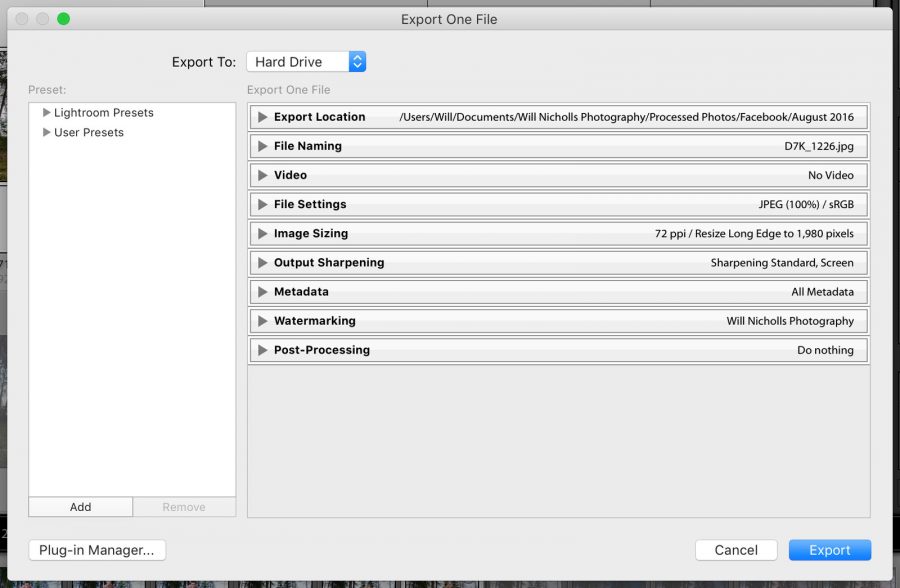
Understanding the Lightroom Export Window

Once you’ve finished processing an image in Adobe Lightroom, you’ll need to export a new file to save a copy of the image with your new changes. The export window has many different options and choices for you to make, but it is pretty simple to understand once you get your head around it.
One of the best things about Lightroom’s export feature is that you can apply it to not just one, but multiple images. This is the great thing about Lightroom – it speeds up your workflow tenfold. Let’s take a look at the different sections of the export window.


#1 Export Location
This one is pretty simple. You can choose the directory where you want to save all the photos from the current export. The ability to specify a subfolder to create within your main directory can remove the need for you to continually search through the directory listings to place photos from different shoots into their own separate folders.
The ‘Add to Catalog’ function will place the exported file back into your Lightroom catalog. You can also add it to a stack with the original file, so it is not added entirely alone but instead attached to the relevant file.
#2 File Naming
Keep organisation simple with these easy to use file name options. They help you to properly organise and identify different files with the name, whether that be by specifying a shoot name or date. Lightroom will spit out an example file name below so you can see what it looks like before you commit.
#3 File Settings
Of the image format options, JPEG is the most common and likely choice. TIFF allows you to save an extremely large file format, sometimes useful for large printing or to avoid compression. DNG is a ‘digital negative’ – essentially a raw file with metadata included within the file, and that can be read by any photo editing software on any computer. Original allows you to create a copy of the original source file in Lightroom, but your edits won’t be applied.
When selecting your color space, you’ll mostly be sticking to sRGB. The advantages between the different options is something for another tutorial, but sRGB is the favourite nowadays, especially for display digitally and online.
Limiting the file size allows you to ensure that a file isn’t saved too large. This is great for when you are sharing images online and size does matter.
#4 Image Sizing
If you want to resize an image, just tick the box and select the proportions you’d like to adjust. There are various options:
You’ll find yourself using ‘long edge’ most often. This allows you to specify the longest dimension of the file, but keeping it properly proportioned. Ticking don’t enlarge ensures that no photo is stretched beyond the size of its original file, should your resize specifications be too large.
Resolution is to do with offline printing, but typically it is left at 72 pixels per inch for uploading online. This reduces the quality of a print which can be created from that file should someone lift it from the internet. If you’re printing the file you’re exporting, then you’ll more than likely need this at 300 pixels per inch.
#5 Output Sharpening
Sharpening is essential if you’re resizing your file. Shrinking it down in size will see the sharpness degrade, so sharpening the photo again on export (even if you have already done so during processing) is a must. You may also need to sharpen your file for printing, as different papers absorb inks differently to each other, and can cause prints to appear soft.
Sharpening for the screen is what you do when the photo will be viewed on a monitor of some kind. Matte is for any uncoated papers, and glossy is for any coated papers.
As for the amount, this is up to you. There is no correct amount of sharpening, so you’ll probably have to find out what works for you by testing the three options. Personally, I go for standard – unless there is a major decrease in file size, then I may opt for high.
#6 Metadata
Your photos will all have some degree of metadata. That could just be the original settings from the camera, or you may have specified keywords too. This is all included in the metadata. Sometimes you don’t want it all saved to the file though, depending on what its final purpose is. You can choose what sorts of metadata to export in this window. It’s pretty self explanatory, but if you’re wondering which option to go for, then just stick to ‘All Metadata’ – there’s no harm in this.
#7 Watermarking
I love this feature. Being able to watermark en masse means you can keep it uniform across all your images. It looks much more professional than a watermark applied manually in Photoshop – they tend to vary slightly from image to image. You can store as many watermarks as you need in Lightroom, and choose the ideal one from the dropdown menu.
#8 Post-processing
Want to do some more processing work? Then you can select for the file(s) to be opened in a program of your choice. That might be anything from Photoshop to GIMP – all of which can be selected here.
Lightroom Presets
You can also add and select presets from the panel on the left of the export window. If your export process tends to be the same, then you should add your workflow to the presets so you can easily call upon it. This will save you a lot of time in the long run.
Further Reading: “5 Tips to Improve Your Lightroom Workflow” and “All You Need to Know to Process a Raw File in Lightroom“


