
How to Take Creative Photos of Autumn Trees
If I had to pick one time of the year to photograph trees then it would have to be autumn, and I’m sure most photographers would say the same. Autumn photography brings a whole new palette of colours to the fore. Gone are the dark greens of summer, replaced instead by vivid yellows, warm oranges and flamboyant reds.
Birches, beeches, oaks and rowan all put on an extravagant kaleidoscopic display of colour that bedazzles and enchants, compelling us to reach for our cameras and head down to the nearest woodland.


To be honest, I’m happy photographing trees in whatever shape or form they come; in any colour and using any variety of techniques. But what excites me most about trees is their creative potential.
For what is essentially a static subject, trees provide an ideal opportunity for creating exciting images. All you need are a few basic techniques together with a willingness to experiment, and you’ll be amazed at what you can produce.
Creativity in autumn photography
So what is a ‘creative’ shot of a tree? Well, this is open to interpretation of course, but on a personal level a shot that I would consider as creative is one that breaks away from a purely true representation of the subject. An image that depicts a tree or woodland in a style that is somehow removed from a documentary record shot could therefore be described as creative.
1. Perspective
This could be achieved through the use of an extreme wide-angle, the innovative use of a telephoto lens, an unusual perspective, or by using in-camera techniques that distort or alter the appearance of the image in some way.
One very easy yet effective technique is to use a wide-angle lens to shoot the tree canopy. There is nothing radical about this approach, but it’s a simple way of creating an alternative view of a woodland interior when photographing autumn.

A focal length lens of around 16-21mm on a full frame camera (or equivalent on a cropped sensor) will produce a great result. The critical thing for this shot to work is to find a stand of tall evenly spaced trees that will produce a roughly symmetrical spread of branches when you look directly upwards. It’s worth spending some time to find the best section of trees and keep checking how it looks through the camera.
The shot tends to work best on a sunny day with a clear blue sky so that you have a deep blue even background to the branches. Contrary to the norm, midday sun is also preferable because the leaves will be backlit more evenly than if the sun is coming from a lower angle.
The easiest way to take the shot is to hand hold the camera and, because you’re using a wide-angle lens, the shutter speed only needs to be 1/30th second or faster to eliminate any camera shake.
For the optimum perspective, lie on the ground – pack your waterproofs for this or take a plastic sheet to lie on. This allows you to include more of the trunks of the trees in the picture and exaggerate the perspective. Set the aperture to f/11 or f/16 to give a good depth of field and focus about half way up one of the trunks.
You may need to adjust the exposure if either the trunks are too dark or there is too much burn out in the sky. With the high contrast of this shot some compromise may be necessary so a little burn out or blocked shadows may be inevitable. By shooting in raw you can recover some, if not all, detail in bright and dark areas of the picture during processing.

If you own a fish-eye lens, this technique can be used not only for shooting the woodland canopy but also for shots of the woodland in general. It produces some wonderfully distorted tree trunks on the edges if the frame which can be used to frame other trees in the background. It takes a bit of getting used to as small changes in the positioning of the camera can make a huge difference to the appearance of the trees in the shot but its fun to try. I use a Sigma 15mm fish-eye, which is a reasonable price and produces good results.
2. Motion blur
The other techniques I’m going to discuss involve movement – either of the subject or the camera – to create subject blurring. The simplest way to do this is to rely on Mother Nature to generate some gusty wind to move the leaves and branches, and then set a slow enough shutter speed to record this movement as blur.
The idea is straightforward enough, but to generate a slow shutter speed you need to get your settings right and you may need to add filters to the lens to reduce the amount of light reaching the sensor.

A small aperture is the first staring point – f/16 is what I typically use – plus the lowest ISO setting that’s possible on your camera. On a sunny day, this will generate a shutter speed of around 1/30th – 1/100th second. That’s way too fast to record any significant blurring. So, time to add some filters.
A polariser will reduce the exposure by around 2 stops and has the added benefit of reducing surface glare on the leaves making the colour more saturated. To lengthen the shutter speed further you’ll need to fit a neutral density filter (ND). These come in various strengths, but if I had to buy one I’d go for a 3 stop version (0.9ND).
Read more: The Essential Guide to Filters
The alternative of course is to shoot on a dull day – and we’ll get plenty of those in autumn – or at dawn and dusk when light levels will be much lower.

Aim for a shutter speed of 1 second or longer to create a good blurring effect. To take the shot, make sure the camera is mounted on a solid tripod that’s not going to move in the wind, and also use a remote release so that you can time the shot better when the leaves are moving a lot.
I often use a 70-200mm lens for this kind of shot as it makes it easier to compose a fairly tight composition with an uncluttered solid background – blue sky or a hillside for example. I tend to avoid ‘white’ skies, as this doesn’t usually give a good result.
Although the moving leaves are the creative part of the shot, the picture needs some kind of anchor. The trunk of the tree or thick branches work well for this as they won’t move so much in the wind and will therefore be relatively sharp, which provides a good contrast to the blurry leaves.

3. In-camera movement
An alternative approach to waiting for the wind to blow is to introduce some movement of your own by moving camera during the course of the exposure. In-camera movement as its sometimes referred has become an increasingly popular technique and is surprisingly easy to execute.
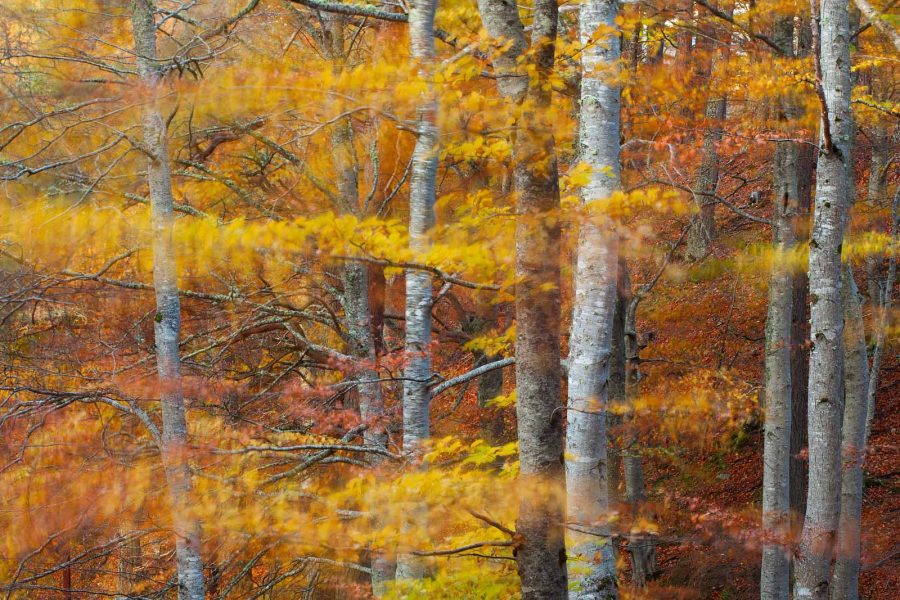
In basic terms, it involves moving the camera in a controlled way during a long exposure to intentionally blur the subject. This technique can be used to photograph trees in various ways but one style that remains among my favourites is what has been dubbed the ‘drag shot’.
This is a technique best applied to tall straight tree trunks to create the effect seen below.

This shot was created by moving the camera smoothly in a downward motion, but it can also be done by moving the camera upwards. One way to do this is to hand hold the camera and move it quickly with a shutter speed of around ½ to 1/8th second.
Alternatively, mount the camera on a tripod and move it more slowly with a shutter speed of between 1 and 2 seconds. If you have a pan and tilt style tripod head, then it’s quite easy to pan up or down smoothly. The important thing is not to introduce any lateral movement, as this will spoil the effect.
The basic settings are small aperture and low ISO, but if done in a dark woodland setting then use whatever settings are necessary to generate the required shutter speed.
Read more: How to Capture Movement in Landscapes
The technique takes a bit of practice and each picture will be different, but persevere until you get something that you’re happy with. I find it helps to use the 2 sec delay (self-timer) to create a smooth pan. This way I can press the shutter and then begin to pan so that the camera is already moving smoothly once the exposure begins.
To create a more interesting shot try to include some colour in your autumn photography as well. This might be autumn leaves between the trunks or colourful ground foliage on the woodland floor.
Also carefully consider the start and end positions of the pan avoiding any bright hot spots in the sky at the top of the frame and finishing just below the base of the trunks so that the shot has a base.

Tree drag shots are a great way to create interesting shots on a day with poor light when there aren’t too many other options, and can be used equally well at any time of year. It’s also worth experimenting with this technique in different lighting conditions. Backlighting is really nice to play around with and produces some dramatic results.
4. Moving the tripod
A final option on this topic is to move the tripod rather than the camera itself. By doing this you can generate slightly different results by oscillating the tripod up and down or simply wobbling it to produce a soft focus effect.
With longer exposures of more than 2 seconds you can start moving the tripod part way through the exposure rather than at the start. This creates an effect similar to a double exposure, whereby the first part of the exposure renders the subject sharp but this is combined with some blurring when the tripod is moved.
It’s basically a matter of experimenting with different types of movement and seeing if you like the results. Some may appeal, others won’t, but it’s great fun trying and the exciting thing about it is that every picture is different.

In conclusion
Photographing autumn is one of the best times to get out and be creative with your camera shots.
Hopefully this tutorial has given you some ideas for how to spice up your autumn photography and try out some creative shots this season.


