
How to Use Facebook to Promote Your Photography

Social media is a very powerful tool when it comes to self-promotion. Facebook boasts 1.35 billion monthly active users – definitely an audience and market worth tapping into. There are both advantages and disadvantages to using Facebook, as well as some infuriating issues you may come across too. However, it is definitely an option that should be looked into by any photographer wanting to show off their work.
Navigation: My Experiences | Setting Up a Page | How to Get Likes | Problems | Top Tips
My Experiences with Facebook
I’ve used Facebook for many years now, and it has played a huge part in promoting myself as a wildlife photographer. I started my first photography Facebook Page in 2009, although migrated to a new one after accidentally deactivating my personal profile and losing everything! Ever since, I have posted regularly and use it as a great way to engage with my following and let them know what I am up to (photographically speaking).

The image above is a screenshot of my Facebook Page on the 25th January 2015. I have a modest 5,505 Likes that I have built up over time, and you can see one of my posts pinned to the top of the page for everyone to see. There are wildlife photographers who have 100,000s of Likes on Facebook, but as of yet I have not reached those numbers! I will talk more about advertising and paying for Likes later on.
I find that a reasonable number of my followers on Facebook have met me in person, whether that be at trade shows or other events, and have then wished to continue following my work. Facebook is a great way to do this, as my updates appear in their News Feeds on a website that they most likely visit daily. The personal nature of Facebook allows your followers to feel that they are getting to know you on a more “real” level, rather than just looking at your work on your website or in a gallery. This can only be a good thing, as it helps to build a relationship with potential customers.
Facebook has proved a great way for me to network with other professionals, both photographers and editors, for example. On a monetary basis, it is an excellent way to drive traffic to your website and generate real sales. I have an online shop on my portfolio website (hosted by Zenfolio, which I have reviewed here) and I use Facebook to tell my followers about any sales or new products I am offering. This generates interest, and subsequently sales.
You can see my Facebook Page live at this link. If you Like and follow my Page, you will see exactly how I use it on a day to day basis (shameless self-promotion – that is what this article is about after all)!
Want to improve your social media presence? Try The Photographer’s Guide to Social Media Marketing
Setting Up Your First Facebook Page
To guide you through the process of starting your Page, I am setting up an example Facebook Page. Follow the steps below, and by the end you will have your own Page that is ready to share with everyone!
1. Registering Your Page
Setting up a Facebook Page is free and it is definitely worth a try if you are serious about getting your name out as a photographer. You can register for a Page at this link. The first thing you’ll have to do is categorise your Page. There is a specific photographer option, which can be found by clicking the “Artist, Band or Public Figure” icon, and then selecting “Photographer” from the dropdown menu.
Choosing your Page name properly is important, as you are unable to change this once your Page reaches a certain number of likes. Most photographers choose their name followed by “Photography”. This is a good move, as the first thing people see is your name and that is ultimately what you are looking to promote. However, choosing a business alias such as “Eclipse Photography” is another route. It is up to you which road you choose to go down. For this example, I’m going to go with “John Smith Photography”.
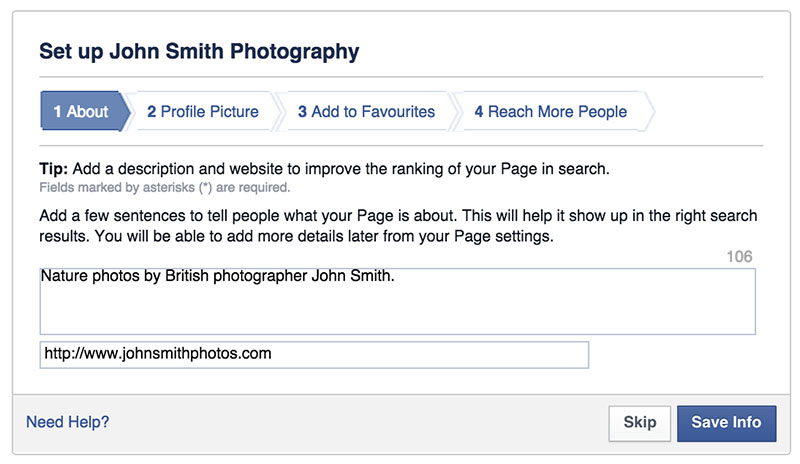
Once you’ve passed the first step for registration, you’ll be asked to fill in some information. Write a short description about you and your photography, as well as a link to your website. Add a profile picture to your Page – personally I think a photo of yourself with your camera is a good idea (it makes it more personal), but you can use a close-up of one of your photos if you are camera shy. The last step here will ask you if you wish to create an advert to promote your Page – click “Skip” for now. I’ll go into more detail about this later on.
2. Design Your Page
You want your Page to look attractive, otherwise people will simply click past it. Your page should look something like this at first sight, plain and begging for some attention.

As this particular John Smith doesn’t exist, our profile picture is going to be one of his (my) photographs. Next, is your cover photo. This is the biggest and first photo that visitors to your Page will see. You could choose one particular “wow” photo, or create a compilation image of your photos and upload that instead. I’ve gone for a leaping red squirrel photo as it fits nicely into the space.

Doesn’t that look much better already? The cover photo draws attention to your Page, and should impress any visitors.
3. Content
Getting Likes will take time, and that shouldn’t put you off from posting your photos. Posting regular, quality content from the start will give people a reason to Like your Page. However, there is no point uploading photos below your usual standard just because you feel the need to post something – this can actually be detrimental to the process. You want people to be impressed with every photo you upload, and that’s what will get you more Likes in the end. So, post as regularly as you can (anything between every couple of days to once a week) but don’t worry too much if you can’t keep up the pace at first.
How to Get Likes
Everybody wants Likes on their Page, and it can almost become an obsession at first. The best thing to do is relax and let this be a secondary priority – the most important thing is to deliver quality content to the following you already have. Every Like matters, so don’t forget about those that you already have in your hunt for more.
It is important to remember that you want good quality Likes, and by this I mean people that are actively interested in you and your photography, rather than just anyone and everyone. There are many ways to spread the word about your Page – here are some options:
1. Going Viral
The nature of Facebook allows people to share photos from your page with their friends on their own profiles. This helps you to increase the amount of people who see your photos (the “reach” of a post), and subsequently will result in more Likes and engagement with your Page. There is no definitive way to get a post to go viral like this, with multiple shares, but posting exciting pictures with an engaging description is definitely a factor. Even if someone doesn’t share a post but Likes or comments on it instead, it will still show up in some of their friends’ news feeds.
2. Invite Friends
You can “officially” invite your friends to Like your Page. It’s good to get a few people to Like your Page this way, as it gives strangers more confidence in you when they see others are already following you. At the top of your page you should see a “Build Audience” button. Click this, and then select “Invite Friends”.

Now, simply click and invite everyone that you think will be interested in your new Page!
3. Advertise
Facebook advertising is a very complex avenue to go down, and an expensive one too. I am not going to go into much detail here, because that is an entirely new topic which would take a long time to cover.
When you create a post, you’ll be asked if you want to “Boost” it. This has also been referred to by some people as the “donate to Facebook” button. If you want to promote a post with an advert and put it in the news feeds of people who don’t already like your Page, then you are better to use Facebook’s Power Editor where you have full control over who sees your advert. You can be quite specific about who you show your advert too, including some of the following things:
- The city or country someone lives in
- Age and gender
- Interests
- Their behaviour online
Facebook will soon be rolling out much more specific advert targeting methods using Facebook Open Graph, but at the moment this is only available in the USA.
Paying for Likes can vary in price depending on how well engaged your advert is. Nature TTL advertises on Facebook, and pays around £0.07 to £0.10 per Like from the UK. This is a very good rate, but some people will see themselves paying as much as £1.00 per Like. So, it is important to make sure you have optimised your advert and are achieving a high click-through rate (CTR). 0.1% is a good CTR, and anything more is exceptional. Some of the Nature TTL adverts have been as high as 1.5%, which helps to bring our cost per Like down. Set yourself a budget and be realistic about what you expect from your advertising campaign.
Advertising to countries such as India can let you buy Likes for as little as £0.01 each, but this is not a good idea. Recently there has been a lot of discussion of “click farms” in similar countries, and a lot of these Likes are subsequently fake. Companies that sell Likes unofficially on the internet have been found to Like legitimate adverts on Facebook too in a bid to disguise their fake accounts. Unfortunately, these are particularly apparent in less economically developed countries such as India. Buying these cheap Likes simply dilutes your following and is detrimental to your page – plus, you can’t remove them once they are latched on.
4. Run a Competition
Hosting a competition on your page is a great way to increase engagement. A caption contest with a funny photo is always an entertaining option (for both you and your followers). Or, you could simply offer an incentive (such as a free print of one of your photos) for people to Like your Page.
It is worth noting that when offering these sweepstake type competitions, Facebook only allows you to make Liking the Page a requirement for entry. Asking people to share, comment on or Like a specific post to be eligible to enter is against Facebook’s terms and conditions, and could result in your Page being closed down without warning.
Problems with Facebook
Naturally, Facebook wishes to make money from business that use its services. While it is free to create a Page and post to it, they will now only put your post in the news feeds of around 10% of your followers. If you want more people to see it, you need it to either go viral or to pay for an advert. This is very frustrating as when you advertise to increase your Likes, you still need to pay each time you post to be sure that they see it.
When you post a link to an external website in a post, Facebook will show it to even fewer people. This is because they think you are monetising from driving traffic to an external site, and they believe you should pay for this benefit. I understand where Facebook are coming from, but I think these measures of assuring businesses are paying for adverts are too extreme, especially for individuals as it can become very expensive.
Another issue, although one that seems unlikely but is not impossible, is that Facebook may not be around forever. How much time and resources do you want to put into your Facebook Page, when one day you could see Facebook shut down without warning? Converting your Likes into a more permanent following, such as subscribers on your newsletter, is a good way to combat this risk.
I also hear a lot of people worrying about posting their pictures on Facebook, thinking that they lose the copyright of their photos. This isn’t true, and there is a lot of incorrect information online through gossiping and scaremongering. When posting a photograph, you do grant Facebook a non-exclusive license to do various things with your photo, but this is just so that they are able to legally allow your photo to be shared on the site with their share button. Otherwise, they’d be breaking the law and anybody could sue them! You won’t see your photos on a billboard just because you posted to Facebook, so don’t worry.
Some Final Top Tips
1. Post Quality Content at the Optimum Time of Day
I said earlier how important it is to ensure that you post regular, quality content. The time of day can also greatly effect the engagement your post receives. Posting in the evening is often the most successful time for me, such as 5pm or 6pm, when people are home from work and relaxing. Post in the middle of the day and you’ll find people are busy and at work.
 To do this, I use a website called HootSuite. It works with many social networks, including Facebook and Twitter, and allows me to schedule my posts to be sent at specific times. This means I don’t have to sit at the computer waiting for the best time to post. There is a free option, which allows you to schedule just a few posts at a time, or a Pro version which allows you to schedule hundreds of posts and manage multiple accounts. (I recommend signing up for a free 30-day Pro trial, and you can then decide whether or not you want to go for the free plan or the paid plan – it’s good value and a lifesaver for those with busy schedules).
2. Sandwich Your Posts
Instead of making every post about promoting things that will make you money, try what I like to call “the sandwich approach”. If you want to post a link to an upcoming sale (for example), then ensure that a couple of days beforehand you post a photo with no links and just engage with your audience. Then, post your sale promotion post and follow it a couple of days later with another normal photo post with no links. This helps to increase engagement, but prevents your followers from thinking you are just trying to use them as “cash cows” and squeeze them for money.
3. Accompany Posts with Photos
You should try and make sure that most of your posts include an image of some kind. Posts with graphics attached to them see a far greater engagement than those without, and you’ll see your reach increase greatly (this statistic is shown under each post to the admin of the page).
4. Enjoy the Process and Engage
Establishing a useful and productive Facebook Page takes time, but it is definitely worth it. Enjoy showing off your work and make sure you engage in the comments of your posts with your followers. Establish a relationship with your audience and they will keep coming back for more! Likes will come and your Page will grow over time, as long as you pay attention to it and keep it up to date.
Good luck! Feel free to share a link to your Facebook Page in the comments of this article, and be sure to follow Nature TTL on Facebook too!


