
How to Merge Photos and Create a Panorama in Lightroom
Panoramic photos are great for capturing a really wide scene, and they bring a fantastic perspective to an image. This tutorial will look at how you can merge photos into a panoramic in Adobe Lightroom, but we have also covered the photographic technique in a previous article.
Which Photos Can Be Merged?
It is important to take panoramic photos with “overlapping” areas in the frame. Whilst panning along (ideally with a tripod) and taking shots at intervals, make sure that the scene is each frame overlaps with the last. This allows the software to correctly align the images together and merge your panorama.


Step 1: Make Initial Adjustments
Once you’ve imported the images into Lightroom, locate the files that you want to merge into your panorama and process one of them as you would normally. Don’t do any cropping yet – the larger the frame the better, as it gives the software a bigger margin for completing the merge. This will make more sense later on.

Once you’ve processed the file as desired, click the ‘Copy…’ button in the bottom left of the Develop window.

Having pressed the ‘Copy…’ button, you’ll be faced with the following window:

Here you can tick all of the adjustments that you want to copy across. You’ll want pretty much all of them selected. Next, select the other images that will make up your panorama. Open them in the Develop window and click the ‘Paste’ button – next to the ‘Copy…’ button. You’ll need to do this one by one – selecting them all and clicking paste won’t push the settings to all the photos at once.
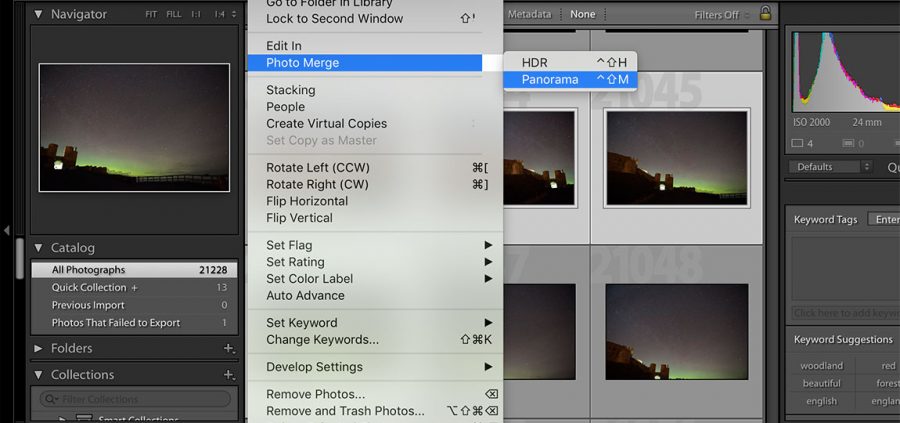
Step 2: Merge the Panorama
The next bit is simple. Select the chosen photos and navigate to ‘Photo > Photo Merge > Panorama’ in the toolbar.

The next window you’ll see will give you a few options for producing the panorama. ‘Spherical’ is the most successful merging option, and it is unlikely you’ll need the others. However, switch between them to see the different results and choose which one suits your panorama.
Once merged, the photo will have warped edges and a white border. This is because the software has altered the perspective of the photos to match them up correctly. To get rid of the white border just tick the “Auto Crop”.

The auto crop feature removes the white border entirely with the least amount of cropping needed to do so. Now there’s only one thing left to do – hit merge! The window will close but your photo won’t appear in the library instantly (especially if your files are large). Look at the task bar in Lightroom and you should see it processing your photo merge – this may take a few moments. Once complete, the photo will be sat in the Lightroom library next to the original photos.

Step 4: Export
The full panorama will be saved into your Lightroom library like any other photo. You can then export and treat it like normal.

It’s easy! Remember, you can also read our expert advice on “How to Take & Stitch Panoramic Photos“.


