
How to Find and Photograph Badgers

It is late on a summer’s evening. A wash of bird song echoes through the wood where I’m sitting; orange sunlight streaming through, illuminating the surrounding landscape and casting long shadows across the woodland. I’m patiently waiting, staring at a mound of earth, hunkered down by a tree and covered in camouflage. Lots of things begin to go through my head. The main one being is whether Britain’s most well known and recognisable mammal, who is well known for its nocturnal habits, would actually appear in daylight? Can I be seen? Can I be smelt? I’m constantly changing the camera settings as the wood gets darker by the minute, upping the ISO and dropping the shutter speed. Finally, after staring at the same scene for over an hour, a flicker of movement from the sett entrance appears and a black and white striped head slowly emerges.
With such an overwhelming and magical experience, you need to keep telling yourself ‘don’t move’! This stunning creature is mere metres away, but the first sign of danger and it will disappear, wasting the whole evening’s stake out. Whilst I’m slowly putting my eye to the camera’s viewfinder, it looks straight down the lens at me – can it see me? Stay still! After a few moments sniffing, it senses the coast is clear, relaxes and fully emerges to go about its business for the evening.


Badgers. They’ve been a hot topic in the media in recent times, and people now associate them with all the wrong reasons. Without getting into any form of argument or choosing a side I’ll simply state what they are, and that is one of our finest mammals in the UK!
Finding Badgers
Badger watching itself is quite easy, the hardest part is finding them. Badgers are very widespread across Britain, and can survive pretty much anywhere. Finding their place of residence and narrowing down where to look for them is a result of analysing their lifestyle and routines. In Britain, their main food source is the humble earthworm, and the best place to find earthworms is in short grass – ideally land that has been grazed by sheep or cattle. So the first point of call would be to check out a site of woodland that is near or next to grassy fields.

Badgers live underground, so to make their life easier the ground where they excavate their sett needs to be the right kind of soil: damp, boggy areas, or anywhere it could flood, is usually avoided. They also prefer to dig into a sloping site. This is probably due to the fact it’s easier to dig into earth sideways rather than down. It saves them the struggle of shifting excess soil up and out the entrance. They don’t tend to travel long distances away from the sett either. Their territories only stretch about a quarter of a mile away from their sett.
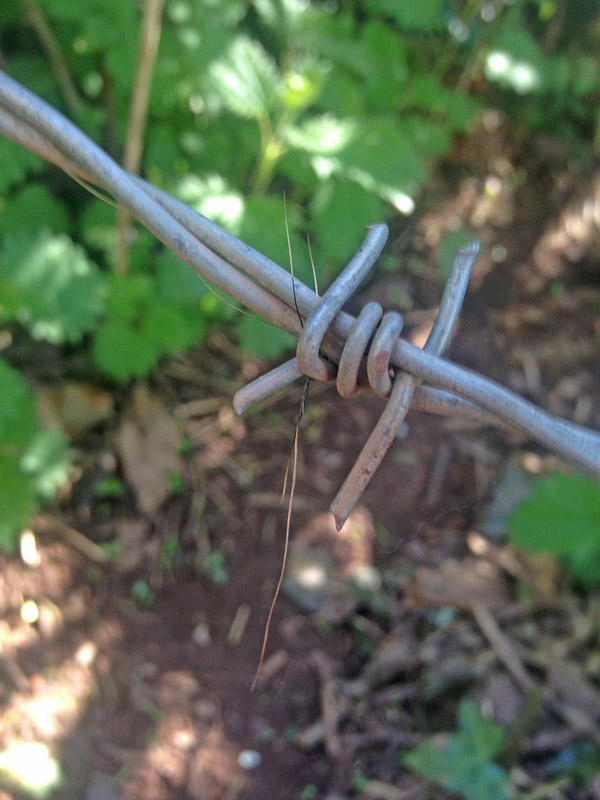
So, you’re now looking for a woodland, or wooded area, on sloping ground close by or next to grassy fields or pasture. Badgers are creatures of habit, and by heading out to an area like this you can’t go wrong. On the grassland, look for signs of rooting (small snuffle holes that are conical shaped and a few inches across). Also, keep a look out for well used paths across the land (‘runs’), especially those that head towards and go under fences. Look closely at the base of the fence. Badgers are hardy animals and don’t mind squeezing under barbed wire. Sometimes their hair gets caught on this, which is a certain sign that they’re around. If you find any hair, pick it up and roll it between your thumb and fore-finger, it should feel irregular. Also, it will be black or grey in colour; a sure sign that this is a frequently used route.
Follow this path into the wood and you’ll start to spot other animal paths that come and go, hopefully ending at the sett itself. If it’s an active sett, it’ll be quite large with many spoil heaps where they’ve discarded any earth that they’ve dug out. There will be signs of maintenance in the form of new excavations or excess old dried grass that they change regularly for bedding. For a better idea of what goes on you could always install a trail camera. These cameras are becoming more and more popular, and can do all the hard work for you. Examine the site around the sett and choose a good viewpoint. Don’t disturb them with it or impact on their habitat.
Further Reading: “The Ethics of Wildlife Photography“
Taking Photos of Badgers
Keep an eye on sunset times and location, so as to position yourself with any fading light behind you. You can get creative however, and site yourself on the opposite side for backlit shots. You should be setup and in position about 90 minutes before sunset. One variable that will change is the wind direction; position yourself with the wind either blowing in your face, or across it and never from you towards the sett (you should be downwind of the sett). A badger’s eyesight isn’t the best, so as long as you’re reasonably camouflaged in dark, muted colours and aren’t obviously sticking out against the skyline you should go undetected.

The final step is to sit and hope that they’ll appear whilst it’s still light. I’m on the fence about using flash with wild animals, and as such I prefer to increase the ISO when light gets low. Like with any wildlife portrait, work out a position where you will get a nice eye-level angle, and use a wide aperture to maximise the available light (whilst also providing a soft, pleasing bokeh). This will not only help you achieve higher shutter speeds in low light, but will also create a more intimate photo and help to make the subject ‘pop’ from the scene.
Drew’s Kit for Badger Photography:
Canon EOS 5D Mark III – The perfect camera for low light shooting. Amazing high ISO capability; deadly silent shutter mode, and a 22 megapixel full frame sensor – perfect if I need to crop my photo.
Canon EF 300mm f/2.8L IS USM – Arguably one of the sharpest lenses Canon make, and allows you to shoot wide open at f/2.8. Versatile, lightweight and has enough reach to keep a safe distance from the badgers.
Tripod & Gimbal Head – As you can imagine, low light equals slow shutter speeds. Using a tripod allows me to drop the shutter speed without the danger of blurry images. A gimbal head gives me free movement of my kit, allowing me to point it in any direction quickly.
Throw-over Bag Hide – Put simply, it’s a large piece of camouflaged coloured mesh cloth, but it works wonders! It helps to break up your overall outline, letting you remain undetected. Also, the mesh is fine enough to keep those biting insects at bay.
Wellies – Super comfy neoprene wellies are a vital piece of kit on any of my shoots. They keep your feet warm and dry when sitting still for hours on end, and are comfy enough to walk for miles.
Jack Pyke Camouflage Suit – Made up of a jacket and trousers, this is a perfect companion for wearing under the baghide. Waterproof and warm, the jacket has a zip out part at the rear for you to sit on, so you don’t need to worry about taking a seat.


