
How to Build a Photography Hide

Recently my wife and I built our first ever wooden photography hide. Over the years we have spent many hours in many photography hides, some better than others. Up to this point we had never had a wooden hide on any of our wildlife photography sites. We are very fortunate to have a very active badger sett just 50 metres from our home. It’s located in a very secluded wooded area on a south facing slope. Our trail camera was capturing a surprising amount of daylight footage of the badgers and we were regularly recording footage of them out foraging at all hours, even at midday!


Last summer we positioned a pop-up hide in close proximity to the sett, allowing us to capture some reasonable images of both the adults and their cubs. This was fine, but the cramped confines of the pop-up hide was far from ideal.
Further Reading: “How to Find and Photograph Badgers“
It was with this in mind that in the spring of this year we embarked upon building our first ‘permanent hide,’ but there was only one issue: we wanted to do it on a really tight budget. We searched around and managed to ‘beg, borrow and steal’ (we didn’t actually steal anything!) enough scrap wood from a few local businesses.
Top Tip: Garden centres use a lot of wooden merchandising displays and renew them each spring. The most useful wood we acquired were the backing boards used to display patio stone circles.
Here is how we made our hide, in eight easy steps!
- Construct the floor of the hide and support frame (if required).
- Build the front panel.
- Build the back panel and door.
- Construct the two walls.
- Construct the roof.
- Build a shelving unit for the tripod head/beanbag.
- Paint.
- Add the finishing touches.
Step 1: Construct the Floor & Frame
As the location for our hide was on a slope, we first had to construct a grid-type foundation platform for the hide to sit on. We had already figured out that the best plan was to cut into the slope and have half the platform/support on the ground and half on stilts. This accounted for the uneven ground.

Top Tip: Always use good quality wood screws. Don’t be tempted to buy cheap ones – you’ll regret it!
We then took one of the ex-garden centre display boards and used these measurements for the footprint of the hide: 1.9 metres x 1.9 metres. The next decision was on how much head room we would need (which we agreed wasn’t that much, as for the majority of the time we would be sat on chairs), and settled on 1.6 metres.
So, we were going to build a hide with a width and depth of 1.9 metres, and a height of 1.6 metres.
Step 2: Build the Front Panel
The frame for the front panel was probably the trickiest part to build as we wanted two main windows (which were 48 cm deep) and a third for the low perspective images. You can see in the image below how we carefully positioned the upright supports to allow this to happen. The cross members just below the windows (top and bottom) are exactly the right height to attach a shelf to both bolt a tripod head to or support a beanbag. We took a lot of time to consider the height we wanted the windows to be, too high and you find yourself getting a sore back from stretching or too low leads to an uncomfortable position. 72cm off the floor seemed to be ideal for the type of chair we’d be using.


Top Tip: If you are using scrap wood. Position the cross members to the size of the pre-cut panels, this saves time and frustration trying to cut large cumbersome panels.
Step 3: Construct the Back and Door
The next challenge was to construct the back section of the hide. This was done in exactly the same way as the front panel, except we had to add in a door. Once again, we constructed the exterior frame to the width of the floor and then screwed in the supports and cross members to the dimensions of the scrap panels we had to hand. The door was made from a basic rectangular frame (122cm high by 66cm wide) with a diagonal support, and was made a few millimetres smaller than the inside measurements of the frame. As the door was fairly lightweight, we only had to use small hinges and a simple sliding bolt to secure the door from the outside.
Step 4: Build the Walls
The two walls were very simple to make with a basic frame and only one upright support, with no cross members, though we did add a small diagonal support at each corner to give each wall a bit of rigidity.

Top Tip: Remember that if the front and back are made to the full width of the floor, the side panels will need to be slightly shorter to fit the width of the floor.
For the roof we were lucky to have another conveniently pre-built, ex-garden centre, stone circle display panel. To make the roof watertight we staple-gunned a piece of camouflage-patterned waterproof tarpaulin to it. The tarpaulin was purchased from Amazon for £13.04.

Step 5: The Roof
If you have to construct a roof, use the same construction method as the walls. It may be worth considering adding an overhang to protect a protruding camera lens from rain dripping off the roof.
Step 6: The Shelves
Using more of our scrap wood, I roughly (and I do mean roughly!) built a shelving unit to support the cameras, tripod heads and bean bags. Remember that in step 2 we had already measured and built the windows of the hide at the ideal height to make sitting for long periods as comfortable as possible. I used a fairly deep piece of wood for the shelf to prevent my knees being crushed up against the front of the hide. The lower window shelf was 24cm off the floor.

Step 7: Paint
We used a Ronseal green fence paint to preserve and camouflage the hide.
Step 8: The Finishing Touches
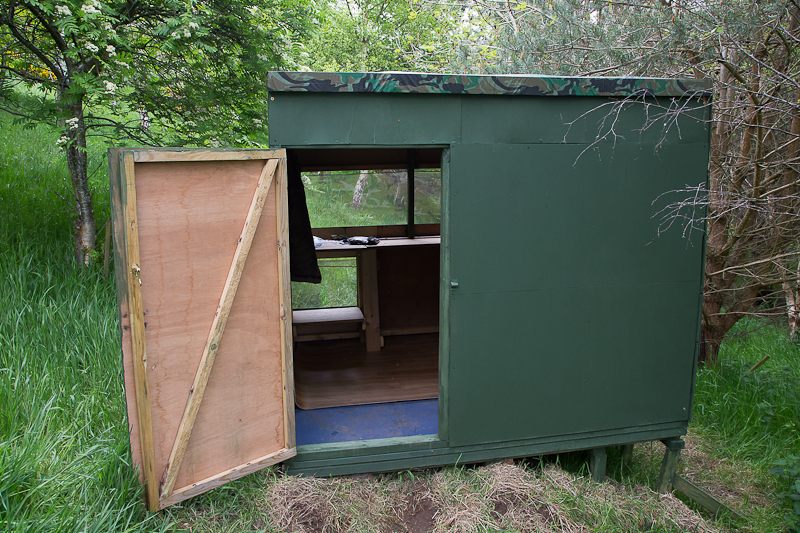
In this instance we added some hooks for hanging coats and bags on. How many hides have you been in with nowhere to hang your bag or jacket? We also used an off-cut of soft vinyl kitchen flooring to mask any noise of chairs scraping on the wooden floor.
I drilled multiple holes on the wooden shelf in various positions to enable a tripod head to be bolted directly onto the shelf. A half dozen 3/8th bolts were purchased from a local ironmongers for £6.00. The last job was to add some camouflage scrim netting to the windows. It is attached quite simply by stretching it over some partially screwed in wood screws.

In the late summer we will be relocating this hide to a nearby forest, so it will double up as a red squirrel hide in the winter months. In the late spring we will move it back again. The hide was made using panels because it is so easy to move around.
Further Reading: “Setting Up a Feeding Station“
I’m pleased to report that my first session in the hide was a success and I was both delighted and privileged to observe and photograph a sow (female badger) for over half an hour. At first she was very wary of the noise from the camera, but soon settled down to devour the copious amounts of peanuts I had scattered.
The total expenditure on the hide was:
- Wood & Panelling £0.00
- Wood Screws £12.98
- Hinges & Bolts £15.84
- Tarpaulin £13.04
- Scrim Netting £11.98
Total Spend = £53.84
Dimensions:
- Height 1.6m
- Depth 1.9m
- Width 1.9m


