
A Guide to Rockpool Macro Photography

Living in landlocked Derbyshire in England, I always get excited when I visit the seaside. A couple of hours exploring rockpools at low tide always turns up exciting macro photography opportunities, and in this article I am going to look at some of the techniques I use.

Using Natural Light
Macro lenses allow us to work at high magnification by having a small minimum focusing distance. In simple terms, we can get the front of the lens close to the subject. One of the biggest challenges of macro photography is that as the camera to subject distance decreases, so too does the depth of field. Even at a relatively narrow aperture such as f16, depth of field is often only measured in millimetres. If we want to get most of our subject in focus, we can generally expect to be using narrow apertures. This often means shutter speeds are too long for reliable hand holding, even with image stabilisation technology. Expect to bring your tripod along!


The sea anemones below were photographed using natural light with a Canon 100mm macro lens. The exposure time was 0.4 seconds at f16 and ISO 500, so a tripod was essential.

Now look at the photo below. We can see an obvious problem that any rockpool photographer will face – surface reflections. To eliminate these, try crouching directly over the rockpool to block out the reflection of the sky as in the photo above. If you find this difficult, a small black umbrella can be very useful. I keep one in my camera bag for such occasions.

A polarising filter can also remove or reduce surface reflections but won’t always be effective, depending on the angle you are working at. Still, it is well worth trying.
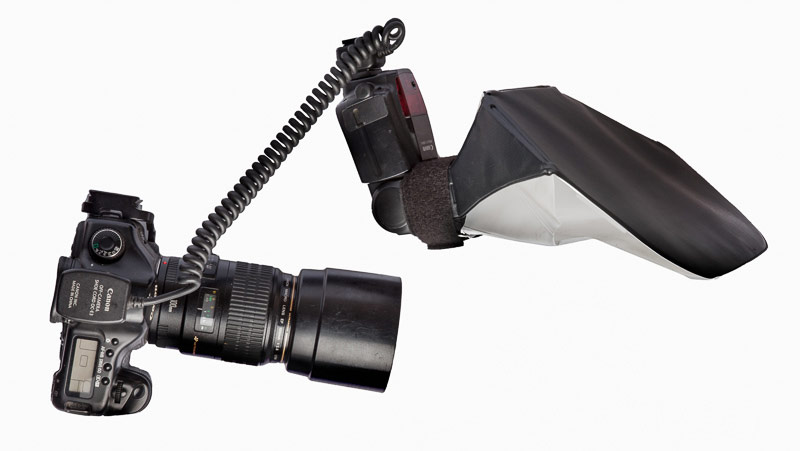
Using Flash
Flash allows us to freeze movement, which can be very handy during a rockpool photography session. When using natural light, you may well end up with shutter speeds as slow as one second, and if during this time the wind ripples the surface of the rockpool or your subject moves, your shot could be ruined. With patience it’s possible to get great results with natural light, but flash can make life much easier.
Expose for the flash rather than the ambient sunlight by putting your camera into Manual mode. Unless you are working in bright sun, camera settings of ISO 100, f/16, 1/200 sec will record very little, if any, of the ambient sunlight. You can then either put your flash into TTL mode and let it work out how much light is needed, or switch it to manual mode and adjust the output to taste.

Many people fear that flash will make their images look unnatural and harsh. This can certainly be the case with the small pop-up flash found on many DSLRs, but if you use a flash gun off camera it is possible to create a much more pleasing result. Pop-up flashes will always give flat results, but an off-camera flash can be angled in from the side to create texture or even applied from behind the subject to backlight it. An off-camera flash gun can be controlled in a number of ways, such as with radio triggers or a master/slave setup, but the simplest method is probably an off-camera flash cord as shown below. The setup below also shows a LumiQuest flash diffuser, which effectively increases the surface area of the flash creating softer light that will look more natural. When using a diffuser, get the flash as close as possible to the subject for the softest lighting. This allows the light to wrap around the subject.
Masters of Disguise
Many inhabitants of rockpools demonstrate wonderful camouflage. For the shot of the blenny below, I used a single off-camera flash fitted with a diffuser. The diffuser has a larger surface area than the flash head, allowing the light to wrap around the subject, creating softer shadows. Using the off-camera lead, I was able to position the flash to the side at such an angle that there were no surface reflections off the water. As a final trick, I placed a small piece of silver foil just out of frame to reflect light from the flash back into the composition and further soften the shadows. The soft light was important here as I wanted to show off the excellent camouflage this fish has and a harsh shadow would have outlined it instead.

Tiny Details
The fish eggs shown below are each just a few millimetres across so the Canon MP-E 65mm Macro lens was used to get good magnification. This lens can be zoomed up to 5x life size magnification, enabling us to fill the frame with a grain of rice. Just be careful not to dip the front element of the lens in the rockpool! I find using a macro focusing rail useful (mine is by Really Right Stuff) as it allows precise and stable positioning of the camera and the focal plane.

Field Studio
Field studio can mean many things; for the image below it consisted of a Pyrex dish propped up between two rocks with a piece of black fabric below it. I positioned two off-camera flash guns underneath and to the side of this setup to backlight subject. Whilst light fall off and careful positioning of the flash guns help give a dark background, I find that a piece of dark velvety fabric ensures a true black is achieved. Always consider the welfare of the creatures you work with and return them to the rockpool you found them in.
Further Reading: “Backlighting in Macro Photography“

Below is a final rockpool field studio shot. This time the field studio comprised of a white plastic food tray filled with sea water that I set up next to the rockpools I was exploring. A flash was placed below to create a clean white shadowless background. A second flash was positioned above to stop the subjects being silhouetted. It is a composite image showing a range of sea creatures that were photographed individually and then combined into a montage in Photoshop. All of these subjects were from the same short length of shoreline and demonstrate the incredible wealth of subjects waiting to be discovered.
Further Reading: “An Introduction to Macro Photography: Equipment” & “An Introduction to Macro Photography: Technique“


